


Part of being a global company is having users from every country/region/walk of life. There are different languages, dialects, slang terms, and nationalities that you have to take into account when you’re producing content for people in their native languages. If you add to the mix the sea of acronyms and abbreviations that everyone uses, you have the makings of a colossal nightmare when it comes to getting it right. Luckily, there is the Azure Custom Translator service to help save the day. Let me show you how you can use this powerful service to keep your translations on point.
Translations depend on machine learning and AI to convert text from one language to another. Azure Cognitive Services has a standard service that is pretty amazing at what it can detect and translate. For when the content is too specific for its limits, a Custom translator can be used to do the job. Before I get to custom translations, I need to get my environment setup. Custom Translator is an extension to Azure Cognitive Services Translator Text. Before I get to any awesome custom translations, I need to get that up and running.
In the Azure Portal, I add a new resource for the Translator Text service. This AI-backed service will allow you to leverage the Azure Cognitive Services capabilities to translate text into a huge number of different languages. There's even Klingon, if you're into that sort of thing. After the service is created, I grab the API Key for use in my Custom Translator configuration.
Read more about Azure Cognitive Services Translator Text
The next step is to create an Azure Custom Translator account. This will allow me to create custom translation projects, upload documents, and train models for my application. I head over to https://portal.customtranslator.azure.ai/ to start the process.
Next, I need to get my custom translation content. For this step, it will depend entirely on the type of translation you are looking for, and how accurate you want the translation to be. When using the Custom Translator service, you can upload sample documents containing your translation or phrase/sentence dictionaries. Supplying samples with 10,000+ lines will help you get the most accurate translation, but it may be tough to get that much content to upload. For your documents, you can use text files, PDFs, spreadsheets, XML, and a number of other formats.
In my case, I am going with a basic phrase dictionary, because it's a lot easier/faster for a demo. This will allow me to do some basic custom translation using some simple words. It won't be the Rosetta Stone, but will demonstrate how the functionality works.
Here is a sample Excel file I have with my translations. The file contains 2 columns of phrases, one for English and one for Spanish.
Note that I am translating hello to buenos dias.
| EN | ES |
| one | uno |
| two | dos |
| three | tres |
| four | cuatro |
| five | cinco |
| six | seis |
| seven | siete |
| eight | ocho |
| nine | nueve |
| ten | diez |
| hi | hola |
| hello | buenos dias |
Read more about supported document types
The last step of the setup is to connect my Custom Translator project to my Translator Text service. This will allow my API call to use both the standard and custom translation services. By using both, I can configure the translation to use my custom translator first, and then “fall back” to standard translation if it can’t match the term. This will allow me to override certain phrases of the translation, while leveraging the Translate Text service for the rest of the content.
In my Custom Translator account, I click the Settings tab and enter my Translator Text API key.
Read more about Custom Translator settings
With the setup complete, I’m ready to create my actual custom service. This involves creating my project, uploading files, creating a model, and deployment.
First, I need to create my new Custom Translator project. I click the Create project button in the portal. I enter the Name / description, select the Language Pair, and set the category. This tells the Custom Translator service what type of content it will be using.
NOTE
Custom Translator projects can only have 1 Language Pair defined. This means if you have multiple languages to translate, you will have a project for each Language Pair.
Read more about creating Custom Translator projects
With the project created, I’m ready to upload my data files. In my case, I have a single Excel file to hold my phrase dictionary. If you opt for your own translated content, you can upload multiple files to help train and test your translation. Just know that it takes quite a bit of content to properly train your model.
Within my project, I select Upload files.
NOTE
The Project Details page displays the Category ID for the project. We will need this value in the API call (described below).
In the Upload files UI, I select the Phrase Dictionary for the Document Type. I then upload my Excel file in the Archive or Translation Memory File section.
Read more about uploading translation files
With the file uploaded, I’m ready to create my model. This process involves consuming the uploaded files and training a model based off of the content.
First, I select the uploaded file and click Create model.
This process starts the Data processing step where the file is analyzed by the service.
Once the data is processed, it queues the model for training.
When the training is complete, the model will be ready for deployment. You will also see the number of dictionary entries the service found in the files. If I uploaded full documents of text, the UI would display the Bleu score and number of training. tuning, and testing entries.
Read more about training models
With the model created and trained, I’m ready to deploy. This allows the Custom Translator service to be available to the API. In my project, I click Deploy for my model.
On the Deploy or undeploy model UI, I select to deploy the model to all regions. This configuration tells the service what region to deploy the model to. This will correlate to the region specified in the API call (shown below). For ease of use, I chose all regions.
After submitting, the UI will indicate the model is deploying.
NOTE: This process may take several minutes, depending on the amount of data and service load.
Once the model is deployed, the UI will update to indicate the model is available.
Clicking on the deployed model will show additional details and status.
After the setup and configuration is complete, the Custom Translator model is ready for use. By using the Translate Text API, I can make calls to translate text, specifying my custom model as part of the request. This is done by specifying the category for the Custom Translator project in my URL. This value tells the Translate Text API to go attempt to use a Custom Translator project for the conversion.
NOTE
For my demo, I’m using a basic C# project to test the API.
Find sample projects to test the Translator Text API
Within in my project, I have the following code in the Main function. In this code I am specifying my category for my Custom Translator project, my Translator Text API key, and the TO and FROM language codes. These values match what I selected for the project language mapping and details.
NOTE
The category can be found in the portal by clicking a project name. The UI will display Category ID.
            string host = "https://api.cognitive.microsofttranslator.com";
            string route = "/translate?api-version=3.0&category=XXXXXXXXXXXXXXXXXXXXXXXXXXXXXXXXXXXXXXX-GENERAL&from=en&to=es&allowFallback=true";
            string subscriptionKey = "XXXXXXXXXXXXXXXXXXXXXXXXXXXXXXXX";
            Console.Write("Type the phrase you'd like to translate? ");
            string textToTranslate = Console.ReadLine();
            await TranslateTextRequest(subscriptionKey, host, route, textToTranslate);
In the TranslateText function, I specify the API key (Ocp-Apim-Subscription-Key), as well as the Region (Ocp-Apim-Subscription-Region) as global in my request.Headers section.
// Build the request.
request.Method = HttpMethod.Post;
request.RequestUri = new Uri(host + route);
request.Content = new StringContent(requestBody, Encoding.UTF8, "application/json");
request.Headers.Add("Ocp-Apim-Subscription-Key", subscriptionKey);
request.Headers.Add("Ocp-Apim-Subscription-Region", "global");
// Send the request and get response.
HttpResponseMessage response = await client.SendAsync(request).ConfigureAwait(false);
// Read response as a string.
string result = await response.Content.ReadAsStringAsync();
TranslationResult[] deserializedOutput = JsonConvert.DeserializeObject<TranslationResult[]>(result);
// Iterate over the deserialized results.
foreach (TranslationResult o in deserializedOutput)
{
// Iterate over the results and print each translation.
foreach (Translation t in o.Translations)
{
Console.WriteLine("Translated to {0}: {1}", t.To, t.Text);
}
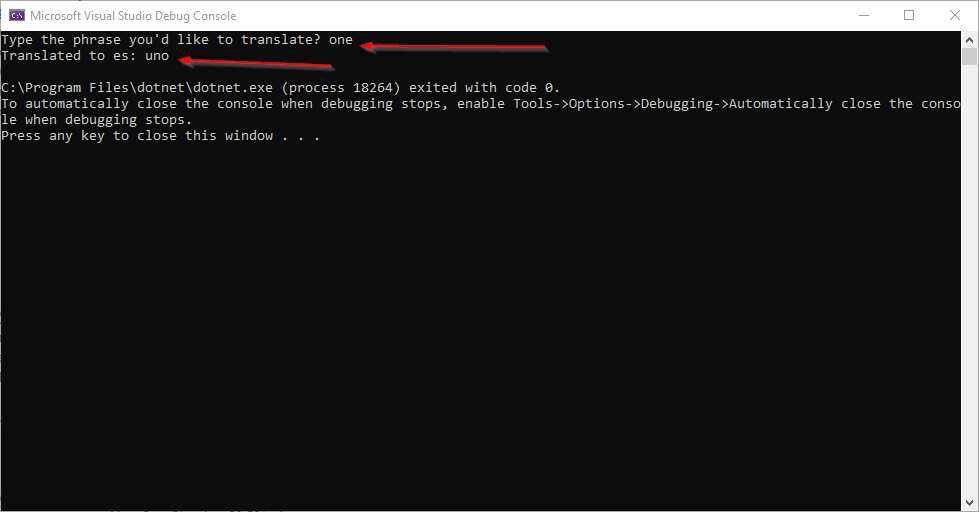
} I then run the application to test the translation. For the 1st test, I enter one, which is translated to uno.
For my 2nd test, I enter hello, which is translated to buenos dias. This test confirms the system is using my Custom Translator project for the translation.

For a final test, I enter sarsaparilla, which translates to zarzaparilla. This confirms that when the Custom Translator model does not contain the text, it falls back to the standard Translate Text service.

The Custom Translator is a powerful addition to your Azure Cognitive Services Translator Text service. This extension allows you to manipulate and customize how terms are translated. By using this functionality, you can replace technical terms and abbreviations with phrases that match your specific context and audience. Your translations will be more accurate and appropriate for your users. The use cases for this can span many industries and systems, while reducing the amount of development and processing that you have to code. Good luck!